- Understanding the Basics of 240V Schematic Wiring
- Crucial Components: Breakdown and Analysis
- Precision Planning: Mapping Your Wiring Layout
- Safety First: Best Practices for 240V Installations
- Mastering the Art of Proper Grounding
- Demystifying Voltage Drops in Your Circuit
- Choosing the Right Wires: Size and Material Matters
- Efficiently Connecting Devices: Tips and Techniques
- Common Mistakes to Avoid in 240V Wiring
- Testing and Troubleshooting: Ensuring a Robust Connection
"Unlock the potential of your electrical projects with our expertly crafted 240V schematic wiring diagram. Gain a professional edge and ensure flawless execution in every connection – elevate your skills today!"
Top 10 important point for #EANF#
Embark on a Journey with 240V Schematic Wiring Diagrams
Whether you're a seasoned electrician or a DIY enthusiast, understanding the intricacies of a 240V schematic wiring diagram is crucial for any successful electrical project. Let's delve into the world of voltages, connections, and safety protocols with empathy guiding our exploration.
At the heart of any electrical endeavor lies the foundational knowledge of 240V wiring. Uncover the mystery behind symbols, lines, and components that shape the blueprint of your power network.

Efficiency is the key. Explore how meticulous planning and strategic layout designs can enhance the performance of your 240V wiring system. A well-thought-out arrangement ensures seamless functionality.

Prioritize safety as we navigate through best practices for secure 240V installations. Learn about safety measures, protective gear, and protocols that ensure a hazard-free environment during your wiring projects.

Discover the reasons behind voltage drops and how to address them effectively. With empathy for the challenges, we unravel the science behind maintaining a consistent voltage throughout your electrical circuit.

Not all wires are created equal. Learn the art of selecting the right wire size and material, understanding their impact on reliability, and ensuring your connections stand the test of time.

Connecting devices demands precision. Explore expert tips and techniques to ensure efficient connections. From terminals to junction boxes, every connection matters in building a robust 240V circuit.

Empathize with common pitfalls and mistakes in 240V wiring. By understanding these errors, you can navigate your project with caution, sidestepping potential issues that may arise during installation.
Ensure the longevity of your 240V wiring by mastering the art of testing and troubleshooting. With empathy for the challenges, we guide you through the process of identifying and addressing issues for a robust electrical connection.
Several Facts that you should know about #EANF#.
htmlCopy codeExploring the Essentials of a 240V Schematic Wiring Diagram
Welcome to the comprehensive guide on understanding and implementing a 240V schematic wiring diagram. In this detailed exploration, we will walk you through the essential components, planning strategies, safety measures, and optimization techniques necessary for a successful 240V electrical installation. Let's dive into the intricacies of this powerful system, ensuring you have the knowledge and instructions needed to execute your projects with precision.
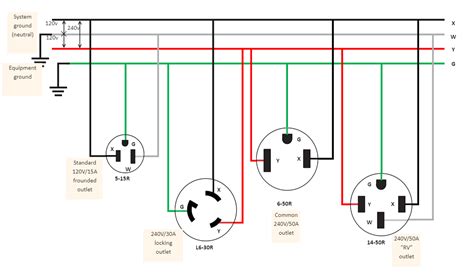
First and foremost, let's decode the fundamental elements of a 240V schematic wiring diagram. These diagrams serve as blueprints for electrical installations, outlining the connections and components required for a 240V circuit. Understanding the symbols, lines, and annotations is crucial for accurate interpretation and successful implementation.
Transitioning to the practical aspect, when you encounter a 240V schematic wiring diagram, look for symbols representing power sources, switches, outlets, and various devices. Lines connecting these symbols indicate the electrical pathways, guiding the flow of current within the circuit. Familiarity with these basics lays the foundation for effective planning and execution.
Now that you've decoded the basics, it's time to optimize the performance of your 240V wiring system through proper layouts. Consider the layout as the strategic arrangement of components and connections to ensure efficiency and functionality. A well-thought-out design minimizes the risk of interference and enhances the overall performance of the circuit.
As you embark on your project, pay close attention to the positioning of power sources, devices, and junction points. Optimal layouts reduce the chances of voltage drops and electrical interference. Utilize the schematic diagram as a guide, placing components strategically to achieve the most efficient electrical flow within the system.
Prioritizing safety is paramount when working with a 240V schematic wiring diagram. This section focuses on essential guidelines to ensure secure installations and minimize risks. Safety measures are not just recommendations but critical instructions that should be followed diligently throughout your project.
Begin by wearing appropriate personal protective equipment (PPE) such as insulated gloves and safety glasses. Before starting any work, disconnect the power source to the circuit you are working on. Always assume that every wire is live until proven otherwise. Familiarize yourself with emergency shut-off procedures and have a fire extinguisher nearby for added precaution.
One challenge often encountered in 240V wiring is voltage drops. Demystifying this phenomenon is crucial for maintaining a consistent electrical supply throughout your circuit. A voltage drop occurs when the electrical energy encounters resistance in the conductors, leading to a decrease in voltage along the pathway.
Refer to the schematic diagram to identify areas where voltage drops might occur. Use appropriate wire sizes and minimize the length of wiring runs to mitigate this issue. Understanding the factors contributing to voltage drops empowers you to make informed decisions, ensuring the reliability and efficiency of your 240V circuit.
Now let's delve into the critical aspect of selecting the right wires for reliable connections in your 240V circuit. Wires are not one-size-fits-all; their size and material play a crucial role in the performance and safety of your electrical system. Refer to the schematic wiring diagram to determine the appropriate wire sizes for each section of the circuit.
Consider factors such as the current load, temperature, and environmental conditions when choosing wires. Copper is a common and reliable conductor for 240V circuits, but aluminum is also used in specific applications. Ensure that the selected wires comply with local electrical codes and standards for a secure and code-compliant installation.
Efficiently connecting devices is a crucial aspect of any 240V wiring project. This section provides instructions on the best practices and techniques for achieving reliable connections between devices, outlets, switches, and other components. Proper connections are key to the seamless operation of your electrical system.
Refer to the schematic diagram to understand the designated connections for each device. Use appropriate wiring techniques, such as stripping insulation, crimping, and tightening terminal screws, to ensure secure connections. Pay attention to the compatibility of devices and follow the manufacturer's recommendations for optimal performance.
Empower yourself by learning from common mistakes that can occur during a 240V wiring project. This section provides insights into pitfalls and errors to avoid, ensuring a smoother and more successful installation process. Understanding these challenges will enable you to navigate your project with confidence and precision.
One common mistake is neglecting proper insulation of wires, which can lead to short circuits and electrical hazards. Another pitfall is using incorrect wire sizes, resulting in overheating and potential damage to devices. By being aware of these common mistakes, you can take proactive measures to sidestep potential issues and ensure a reliable and safe electrical system.
Testing and troubleshooting are integral steps in ensuring a robust 240V connection. This final section provides instructions on the systematic approach to testing your wiring and addressing any issues that may arise. Thorough testing guarantees the reliability and longevity of your electrical system.
Before energizing the circuit, conduct a comprehensive visual inspection to ensure all connections are secure and wires are properly terminated. Use a multimeter to measure voltage, current, and resistance at different points
So, you're diving into the world of 240V schematic wiring diagrams, huh? Let's break it down in a more conversational way, like a friend giving you the lowdown. Here's my take on it:
- Alright, first things first - decoding those symbols. Think of it like a secret language, and the schematic diagram is your decoder ring. Symbols represent switches, outlets, and gadgets - the roadmap for your electrical journey.
- Ever heard the phrase "layout is everything"? Well, it holds true in 240V wiring too. Picture it like arranging the pieces on a chessboard. A good layout minimizes confusion and ensures a smooth flow of electricity without any unexpected surprises.
- Safety is the name of the game. Treat wires like live snakes (well, not literally). Follow safety guidelines to the letter. Gloves, safety glasses, and the power-off mantra should be your best friends during this electrical adventure.
- Voltage drops - sounds like a rock band, right? But no, it's the decrease in electrical oomph as it travels. Keep an eye on the schematic to spot potential voltage drop zones and adjust wire sizes accordingly.
- Picking the right wires is like choosing the right tool for the job. Copper or aluminum? Size matters here. Don't worry; the schematic will guide you like a GPS for wires.
- Connecting devices is where the magic happens. It's like plugging in your favorite gadgets, only with a bit more flair. Follow the schematic dance steps, strip the insulation, and make those connections sing.
- Let's talk about oops moments. Common mistakes are part of the journey. Forgetting to insulate wires? Been there. Using the wrong wire size? Done that. Learn from these hiccups, and you'll be the wiring maestro in no time.
- Testing and troubleshooting - the grand finale. Before you hit the power switch, double-check everything. A visual sweep, a multimeter in hand, and you're ready to unveil your electrical masterpiece.
So, there you have it – a casual chat about 240V schematic wiring diagrams. Remember, it's like deciphering a roadmap; follow the signs, take it step by step, and soon you'll be cruising smoothly through the currents of electricity.
Another point of view about #EANF#.
Well, my fellow voltage virtuosos, we've reached the end of our electrifying journey through the wonders of the 240V schematic wiring diagram. If your brain is buzzing with newfound knowledge, congratulations - you've officially leveled up in the electrifying game of wires and circuits. Take a moment to pat yourself on the back; you've earned it!
As we bid adieu to the land of symbols, layouts, and the occasional spark, remember this: every twist and turn in the 240V schematic wiring diagram is just a puzzle waiting to be solved. So, the next time you're faced with a tangled mess of wires, envision it as your own electric treasure map. Armed with your decoder ring of symbols and the wisdom gleaned from this journey, go forth and conquer the currents. May your circuits be clear, your connections be strong, and your sparks be more metaphorical than literal. Until next time, stay wired and stay weird!
Conclusion : Mastering Power: Unveiling the Ultimate 240V Schematic Wiring Diagram!.
People Also Ask About 240V Schematic Wiring Diagram:
- 1. What is a 240V schematic wiring diagram?
- 2. How do I read a 240V schematic wiring diagram?
- 3. Why is proper layout crucial in a 240V wiring system?
- 4. What safety measures should I follow when working with a 240V schematic wiring diagram?
- 5. How can I troubleshoot common issues in a 240V wiring system?
A 240V schematic wiring diagram is a visual representation of an electrical circuit, illustrating the connections between various components and devices. It serves as a guide for planning, installing, and troubleshooting 240V electrical systems.
Reading a 240V schematic wiring diagram involves understanding the symbols, lines, and annotations. Symbols represent different electrical components, while lines depict the pathways of electrical flow. Familiarize yourself with these elements to interpret the diagram accurately.
Proper layout is vital in a 240V wiring system to ensure efficient electrical flow and minimize interference. Strategic arrangement of components reduces the risk of voltage drops and optimizes the overall performance of the circuit.
When working with a 240V schematic wiring diagram, prioritize safety by wearing personal protective equipment (PPE) such as insulated gloves and safety glasses. Always disconnect the power source, follow emergency shut-off procedures, and adhere to local electrical codes for secure installations.
Troubleshooting a 240V wiring system involves systematic testing using tools like a multimeter. Inspect connections, check for voltage drops, and ensure proper wire sizing. Refer to the schematic diagram to identify potential issues and address them methodically.
Questions & Answer :wiring diagram, electrical projects, safety guidelines, efficient connections, troubleshooting
Keywords : #EANF#